As we approach the next Equinox (March 20th) now is a good time to be ready to shoot the northern lights (or Aurora Borealis if you prefer). When I do art fairs many folks see my northern lights images and tell me it’s on their bucket list, and if you ask me it should be on everyone’s list! I get the same rush of excitement seeing the Northern Lights as I do watching a tornado form, it really is that exhilarating. So below I have outlined When, Where and How to forecast and photograph this incredible phenomenon.
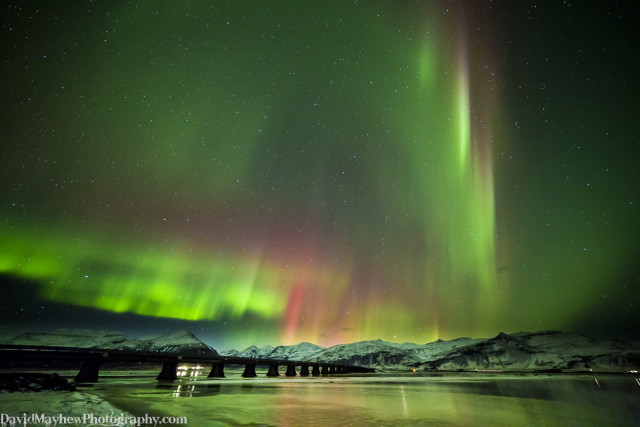
F2.8, ISO 4000 for 13 secs. Iceland.
WHAT are the Northern Lights?
The Northern Lights (Aurora Borealis) and Southern Lights (Aurora Australis) are light displays formed in the polar regions when the magnetic field of earth and solar winds from the sun interact causing ionization of charged particles. They are not entirely understood, in fact I recall a recent study producing the inverse results than were inspected; weather balloons were released into the skies during the northern lights, the goal was to monitor the intensity of radiation in active regions, but the studied showed that radiation levels actually dropped.
WHEN are the Northern Lights most active?
Peaks tend to be in and around the Equinoxes, March 20th and Sept 20th. I have had good luck in late February into March in the past. I even saw them very faintly in July in Iceland once. The more intense the activity is the further south you can see them. Green tends to be the most frequently seen color, I crave the less frequent reds, pinks and purples.
WHERE can you see the Northern Lights?
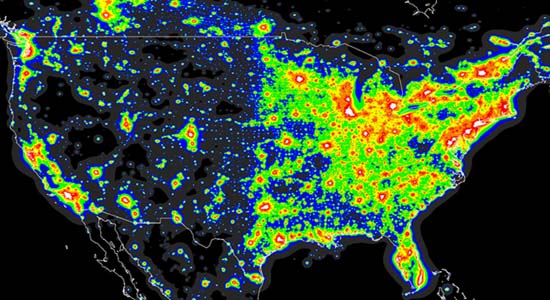
Higher latitudes are more likely to see the display of lights, but different intensities can make them visible further south. I have seen them faintly from East England. Reports have come from France and historical documents have mentioned sightings as far south as Rome. The intensity is measured on the Kp index. 5 is moderate, 7+ is strong, 9 I believe is the max (at least that is what the charts go to). Here are some images to show the location of the lights at various intensities. Of course you can see them south from this positions, they will just be on the horizon as opposed to being overhead.
As you can see Central Northern USA is not a bad spot to be during an active storm. Marquette in the Upper Peninsula of Michigan on Lake Superior is a good place to see them. For me in Colorado some can be seen on active days but moving north east into Nebraska and South Dakota would greatly increase my chances. From my research and experience if you are going full out for a “must see” here are my top recommendations:
1 Iceland
An incredible destination with flights on Iceland Air from many places in Europe and direct flights from Denver, Seattle, Orlando, New York, Minneapolis and Boston in the US. A high latitude destination means you only need a Kp index of 1.87 to see the lights which is easily reached. Being a temperate climate you don’t have to freeze while watching them. Winter temps tend to only be around freezing with slight fluctuations and don’t drop that much over night. Still, it can be very windy at times! Clouds can be an issue but fluctuate. Scattered clouds actually make for interesting shots of the lights. The other main advantage is that if there are no lights or it is cloudy there is so many other things to photograph – iceberg lagoons, waterfalls, ice caves, glaciers, mountains etc If you prefer slightly milder then Sept/Nov would be good, if you like snow and ice then March is good.
If I recall this night the Kp index did not even reach 1.87. 14mm, F2.8, ISO 4000 for 30 seconds
2 Tromso, Norway
On the coast in Norway Tromso is further north than Iceland and therefore colder, but it is also a temperate climate so relatively mild for its latitude. The area is located in Fjord lands, so there is some great scenery to be utilised. It is also a decent size town, so things to do on down days. Norway can be expensive though, don’t expect to be drinking a lot of beer if you are on a more modest budget!
3 Fairbanks Alaska & Yellowknife Canada
Both destinations are far north and get good displays but get really cold being inland. I am not particularly familiar with either. Accessibility might be an issue too and both towns are small. One photographer friend went to Fairbanks for 10 days without much luck for a show and said he was bored out of his mind as there was not much else to do.
Another good way to decide where to go is to monitor the Aurora Gallery on spaceweather.com
FORECASTING
Before even looking at the outlook you should consider a few things:
The Moon – Monitor the moon cycle and location during your intended trip. If it is a full moon it will most likely interfere with your exposure, especially when shooting a foreground. If there is snow on the ground then this will be amplified even more, shortening any exposure time. The lights would have to be pretty strong to balance out the image. Moon Seeker is my favorite app for this as you can choose your location and date and it displays the arc and times. Plus when you are scouting a location the 3D mode allows you to use your phone camera to move around the current surroundings and displays the moon’s path and times it will be at locations.
Dark Skies – find a spot where city lights won’t pollute the skies. That being said photos of the city lights in Tromso Norway with the northern lights look great. I use the Dark Skies app:
So solar flares create CMEs (Coronal Mass Ejections) which head towards earth and can create Northern Lights. The previously mentioned spaceweather.com is a good place to monitor for this plus you can sign up for free email alerts. It will also get you excited by black spots and increased flare activity so you can have your bags packed and ready to roll! If I am not mistaken a CME takes about 1-3 days to reach earth, so that should give a little forewarning.
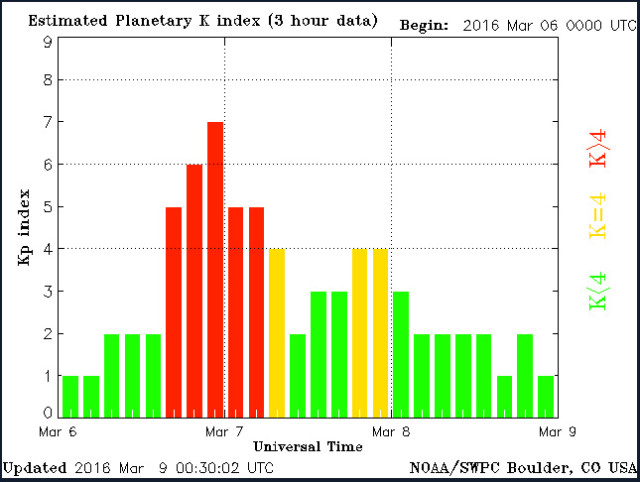
Online another great resource is solarham.net with many useful tools including the most recent Kp readings chart (below) and the CME Tracker. This shows the predicted path of the CMEs relative to earth, allowing for earths motion in orbit around the sun. Play the sequence. Earth is the green dot on the maps and the readings show in the 2 charts with time on the x axis. I have found that Radial Velocity gives a better indication of when lights might peak. Also the forecast Kp index is helpful.
The “Solar Monitor” app shows pretty much the same info as solarham, plus you can set the Kp level alerts too. I also have an app called Aurora Fcst. It has recently been updated to give more in depth outlooks but I cannot vouch for how accurate it is. Still, it gives a nod as to whether to keep an eye out on any up coming days.
Don’t forget to keep an eye out for cloud coverage! Clouds can actually make for an interesting composition but fully overcast ain’t helping no one! For those familiar with forecast models the NAM model Ave Cloud Cover is a good tool. Let me know if anyone has another source, I would love to see a one page does all like this Iceland forecasting page.
GEAR
So once you are there what will you need?
- Camera with low noise high ISO. There are lots of cameras coming out that are sooo good for this now it is too many to list. I still use my Canon 5D Mark III. A camera that is capable at ISO 6400 is plenty.
- Tripod for those longer exposures. You will not likely need more than 30 seconds so a cable release with timer isn’t crucial.
- Flash lit to set camera settings
- Wide angle lens. If you are under the northern lights you won’t be able to go wide enough. It is a question of figuring out where to point the camera! I recommend the Rokinon 14mm F2.8. One other huge benefit is that wider angles have a fuller depth of field, ie near to far focus. Here is a great tool called Depth of Field Master. By putting in your lens and camera you can figure the hyperfocal length. This is the focal length that gets the max focus through to infinity and the tool tells you how near you can focus. With the 14mm F2.8 at the 7.62 feet hyper focal length anything from 3.8 feet to infinity (and beyond!) are sharp. Be careful not to get this wrong though, check sharpness on screen. There used to be an app for doing this in field, but it no longer works on my iPhone. So simply take down this info on a handy sheet before you go off grid.
- Warm clothing, probably!
TECHNIQUE
The intensity of the lights can vary a lot, so you have to adjust the settings as the lights change. My Iceland guide said that he has been able to shoot at ISO 200-400 some nights. Make sure you use the histogram on the camera to check that you are exposing well, the screen will deceive you! It is also useful to check sharpness too or to focus with live view on a star.
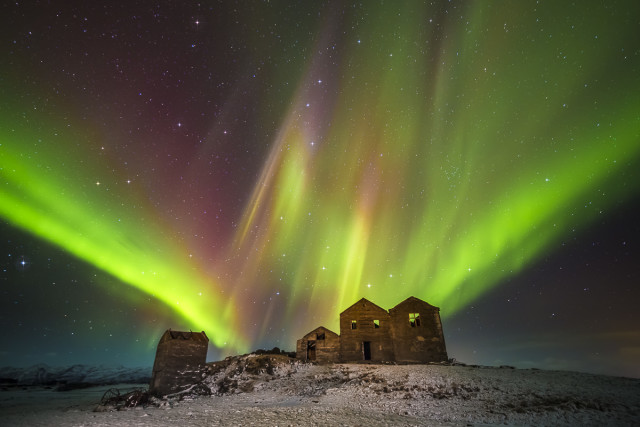
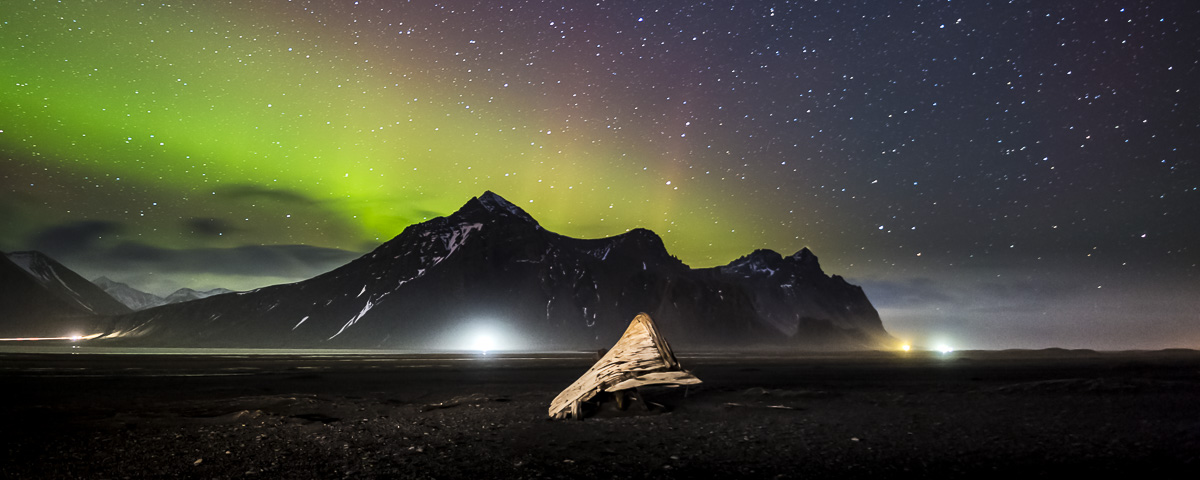
“Ghosts of the Past” 14mm, F2.8, ISO 1250, 30 seconds
Here I did a longer time and a lower ISO to reduce noise. I have seen Northern Lights that barely move and others that slither across the sky like a snake or a curtain in strong wind. The time will affect sharpness of the lights if it is rippling at a speed. Also with a longer exposure I was able to use my flashlight to fill in the foreground that would otherwise have been silhouetted. Plus the longer exposure helps burn in and brighten the capture of the colors.
Edit as you see fit. Easy on the saturation or the colors can become blown out and blocky. In the above image I used a Photoshop star filter plug in that helps highlight the major star formations. A camera will capture more star than you’ll see with the naked eye and it becomes quite busy. The filter will help show constellations we recognize, so in the above image to can locate most of the Big Dipper above the house.
Well, that’s about all that comes to mind right now. Please share any resources that you might have that would be of interest too. Now you have no excuse to not get out there.
No comments
[…] How to Photograph the Northern Lights […]